hi all
i am doing a big steam fair next week selling my jewellery and excess craft stuff, starting to get nervous now. it is a three day event at chassen park in urmston where i live and they expect roughly 12, 000 people through the gates
any money i make will be going to our family camping holiday so i have my fingers crossed because the more i make the more we can do on our hols,
not sure what to name my stall i normally sell under bits and willybobs but that is mostly on the net, should i change my name when selling in person. or should i just add jewellery and crafts after it?? i am going to set up a poll so you can vote on it, please help me to make up my mind, with my name settled maybe my nerves will too.
i shall let you know how i have done next week and wether i would do another big event again
Sunday, 26 April 2009
Wednesday, 22 April 2009
Word book instructions using Microsoft word
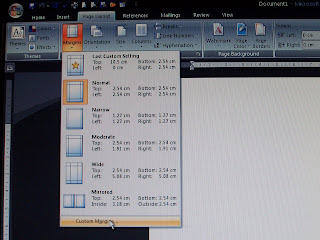
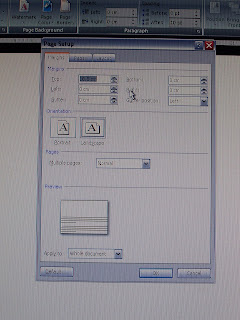
1. Open word and change the page layout to landscape, change the margins to 0 with the exception of the top margin which you change to the height you want your book to b
2. Click on insert picture and choose which background you want to use, stretch the background to cover your chosen page size.


2. Click on insert picture and choose which background you want to use, stretch the background to cover your chosen page size.

3. Click on insert word art and in the text box type the letter you want as the first letter of your book (e.g. A for Adam) change your font to one that you want and your size to the largest size available. Your background will probably disappear at this point but don’t worry we will fix this. You need to format your word art now so either right click and go to format or go to your format tool on your tool bar. Change your text wrapping to through and this should bring your background back. Click on the background and format again this time sending it back, this will bring your word art letter to the front over your backing paper.


4. Resize the letter so that the top of the letter runs against the top of your backing paper and then at the bottom leave a small gap between the bottom of your letter and the bottom of your background unless you have a borderless printer.


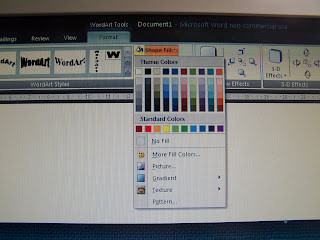
5. I now format the word art again to change the thickness of the outline around the letter, to do this I change the weight to 4pts, I choose to leave my letter unfilled but this is down to personal preference and you can fill or change the weight of the line to what you want, It is possible to add a picture from your files in your word art should you wish. 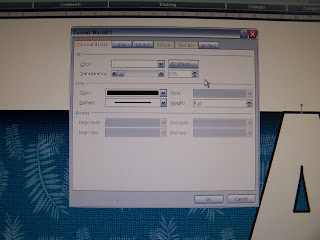


6. Save and Print your page now, then go back and right click on your letter and go to edit text, type in the next letter you need, making sure not to edit anything else and print. Do this for each remaining page in my case, D,A, M. if you wish to have each page on a different background just follow the steps from 2 through again for each page.
7. When all your sheets are printed carefully trim the top, bottom and left edges around the background. When that is done carefully trim around your letter making sure you leave the left side uncut so that it remains attached to your background, do this for each letter.


8. Now it is time to decide on your layout, put your pages into order and decide how you want your pages to overlap, secure in place with a clamp or bulldog clip, then trim to the required length making sure all of the pages now end at the same place.


9. Score a line about 1.5 cm from the left side of each page so your card opens properly and secure together using brads, ribbon, tape or anything else you wish, then decorate .
Friday, 27 February 2009
NEW TUNNEL CARD

I loved making this card it was sooo much fun. The image was from create and craft as was the idea(Michelle Marsden i think)


The card was for my hubbys mums husband

who loves his garden and lives in a lovely little village

who loves his garden and lives in a lovely little village

he was really pleased with it

And so was I.
Hubbys valentines card
This is the card that i made my hubs for valentines day, not sure what this style is called but i have heard it refered to as a stubby diamond, this was my first attempt at this style. I measured and folded the card first and then i made my background using two rubber stamps that i had, i masked of the top bit of the bottom layer to stamp it ad then when it was finished i used a black border peel off to define the two areas. I then made another much smaller card to sit on the diamond part and using a penny black stamp, i embossed the image and (very rubbishly) coloured it


Never was i so suprised to receive a handmade card, this is my hubbys very first attemp at cardmaking and though he still has some way to go i love it. (i know the real reason he made it was because he forgot it was valentines day and he sneekily made it the night before)
Wednesday, 11 February 2009
not forgotten
hi all,
dont worry i havent forgotten about my blog, but i have been so busy with a card order and my children that i just havent had time to come on much, plus my computer is playing up a little and sometimes denies me access to the internet completely, i will be posting piccies of the card order soon so keep watching, plus i soon hope to be taking part in some of the challenges too
dont worry i havent forgotten about my blog, but i have been so busy with a card order and my children that i just havent had time to come on much, plus my computer is playing up a little and sometimes denies me access to the internet completely, i will be posting piccies of the card order soon so keep watching, plus i soon hope to be taking part in some of the challenges too
Tuesday, 27 January 2009
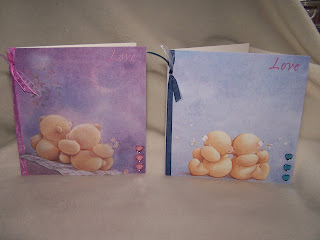 i decided that this year i would make a valentines card for each of my two children, just something quick but which told them we loved them as i think thats what valentines day is about it doesn't have to be for your partner.
 the above one is for little girl who loves her pinks
and the one below is for my little boy, who i had to put a touch of pink on because he loves pink to well for the moment anyway
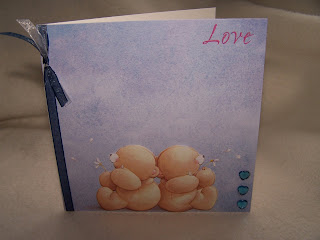
both cards are actually decoupaged but you cannot really see that from the photos
Friday, 23 January 2009
First christmas card for 2009
 Just finished my first card for christmas this year, i was very unorganised last year and there is no way i am going to make the same mistake again this year. The card is decoupaged, mounted onto holographic card, and mounted on the left top left side of the card. A blue ribbon has been added with a little tag BEARING... the same picture as the main design for a little movement.
Thursday, 22 January 2009
having a dabble

I have been watching create and craft today and
decided to have a go at a card that Nancy Watt made
as i really liked it and thought that most little girls would too
New year, New blog
Hi all and welcome to my new blog
As we left 2008 and entered 2009 I made two resolutions which I have vowed to myself not to break.
My first resolution was to create at least one of the projects from every card or jewellery magazine that I buy and the second was, well your looking at it, to create a new blog for crafting purposes only. I have been urged by family and friends alike to set up a blog to display my creations and to keep it up to date
So here it goes and this time I hope I can do it.
Subscribe to:
Posts (Atom)